目次
1.Mavenとは
Apatch Mavenはプロジェクト管理ツール(ビルドツール)で、プロジェクトの作成、ライブラリの管理、プログラムのビルド、テスト、実行、デプロイなど一連の開発に必要な作業ができます。
・Mavenでは開発に必要な要素をPOM(Project Object Model)のファイル(pom.xml)に記述します。
・Mavenのプロジェクトのディレクトリ構成は決まっています。
・MavenはPOMファイルに記述されたライブラリなどを参照して、リモートリポジトリから自動的にローカルのリポジトリにダウンロードしてプロジェクトに組み込みます。その ローカルリポジトリのライブラリなどを参照してビルドを行います。
2.Mavenの準備
下記はWindowsで使用する場合の説明です。
(1)Mavenのダウンロード
https://maven.apache.org/
バイナリファイルをダウンロードして、圧縮ファイルを展開します。
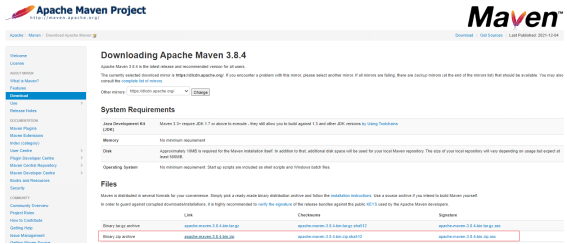
バイナリファイルを任意の場所に配置
(C:\Users***\Documents\apache-maven-3.8.4\)
(2)環境変数の追加
コントロールパネル>システムとセキュリティ>システム>システムの詳細設定>環境変数
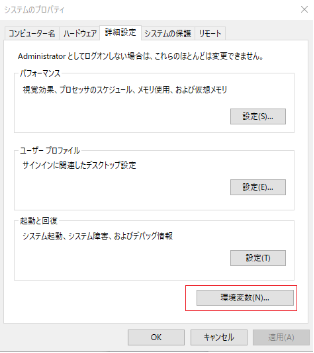

Path>編集>新規ボタンでbinフォルダがあるディレクトリを設定します。
ここでは、
C:\Users***\Documents\apache-maven-3.8.4\bin
を設定し、Windowsを再起動します。
3.Mavenプロジェクトの作成
(1)コマンドプロンプト
プロジェクトフォルダを作成するディレクトリに移動して下記のコマンドを実行します。
> mvn archetype:generate
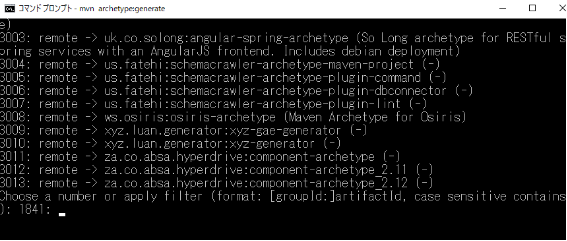
Enter押す
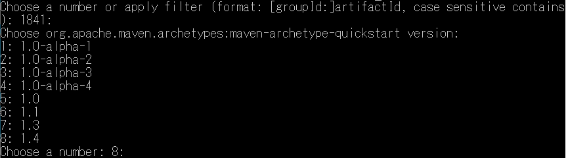
デフォルト値でEnter押す
ここでは、groupId:test、artifactId:sample1、version:デフォルト値、package:デフォルト値(groupIdが設定される)とします。
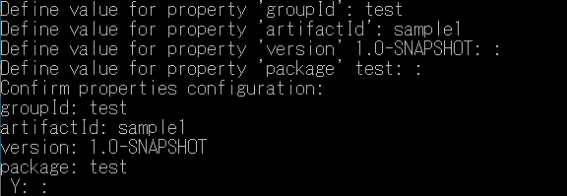
修正なければEnter押します。
下記の構造のプロジェクトフォルダが作成されます。
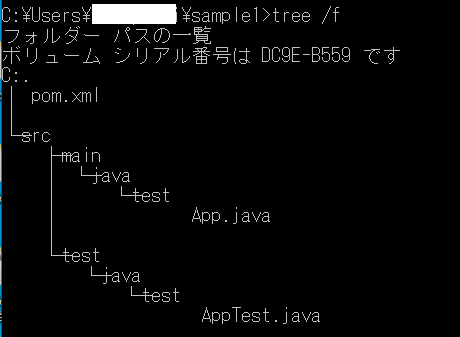
main/java/test/App.java
package test;

/**
 * Hello world!
 *
 */
public class App
{
    public static void main( String[] args )
    {
        System.out.println( "Hello World!" );
    }
}
test/java/test/AppTest.java
package test;
import static org.junit.Assert.assertTrue;
import org.junit.Test;
/**
* Unit test for simple App.
*/
public class AppTest
{
/**
* Rigorous Test :-)
*/
@Test
public void shouldAnswerWithTrue()
{
assertTrue( true );
}
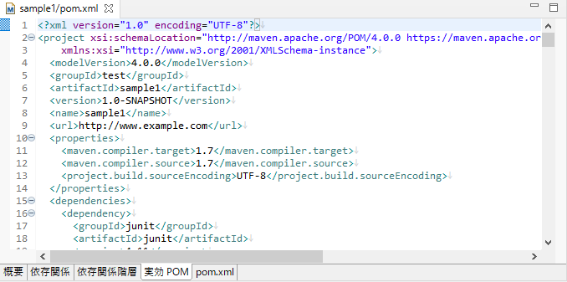
}(2)pom.xmlの作成
<?xml version="1.0" encoding="UTF-8"?>

<project xmlns="http://maven.apache.org/POM/4.0.0" xmlns:xsi="http://www.w3.org/2001/XMLSchema-instance"
  xsi:schemaLocation="http://maven.apache.org/POM/4.0.0 http://maven.apache.org/xsd/maven-4.0.0.xsd">
  <modelVersion>4.0.0</modelVersion>

  <groupId>test</groupId>
  <artifactId>sample1</artifactId>
  <version>1.0-SNAPSHOT</version>

  <name>sample1</name>
  <!-- FIXME change it to the project's website -->
  <url>http://www.example.com</url>

  <properties>
    <project.build.sourceEncoding>UTF-8</project.build.sourceEncoding>
    <maven.compiler.source>1.7</maven.compiler.source>
    <maven.compiler.target>1.7</maven.compiler.target>
  </properties>

  <dependencies>
    <dependency>
      <groupId>junit</groupId>
      <artifactId>junit</artifactId>
      <version>4.11</version>
      <scope>test</scope>
    </dependency>
  </dependencies>

  <build>
    <pluginManagement><!-- lock down plugins versions to avoid using Maven defaults (may be moved to parent pom) -->
      <plugins>
        <!-- clean lifecycle, see https://maven.apache.org/ref/current/maven-core/lifecycles.html#clean_Lifecycle -->
        <plugin>
          <artifactId>maven-clean-plugin</artifactId>
          <version>3.1.0</version>
        </plugin>
        <!-- default lifecycle, jar packaging: see https://maven.apache.org/ref/current/maven-core/default-bindings.html#Plugin_bindings_for_jar_packaging -->
        <plugin>
          <artifactId>maven-resources-plugin</artifactId>
          <version>3.0.2</version>
        </plugin>
        <plugin>
          <artifactId>maven-compiler-plugin</artifactId>
          <version>3.8.0</version>
        </plugin>
        <plugin>
          <artifactId>maven-surefire-plugin</artifactId>
          <version>2.22.1</version>
        </plugin>
        <plugin>
          <artifactId>maven-jar-plugin</artifactId>
          <version>3.0.2</version>
        </plugin>
        <plugin>
          <artifactId>maven-install-plugin</artifactId>
          <version>2.5.2</version>
        </plugin>
        <plugin>
          <artifactId>maven-deploy-plugin</artifactId>
          <version>2.8.2</version>
        </plugin>
        <!-- site lifecycle, see https://maven.apache.org/ref/current/maven-core/lifecycles.html#site_Lifecycle -->
        <plugin>
          <artifactId>maven-site-plugin</artifactId>
          <version>3.7.1</version>
        </plugin>
        <plugin>
          <artifactId>maven-project-info-reports-plugin</artifactId>
          <version>3.0.0</version>
        </plugin>
    	<plugin>
			<groupId>org.codehaus.mojo</groupId>
			<artifactId>exec-maven-plugin</artifactId>
			<configuration>
			<mainClass>test.App</mainClass>
			</configuration>
		</plugin>
      </plugins>
    </pluginManagement>
  </build>
</project>
・ライブラリの追記
<dependencies>タグ
プロジェクトで必要なライブラリをタグで追加します。
   <dependencies>
    <dependency>
      <groupId>junit</groupId>
      <artifactId>junit</artifactId>
      <version>4.11</version>
      <scope>test</scope>
    </dependency>

(ここに追加します)

  </dependencies>
・プラグイン情報の追記
<plugins> ~ </plugins>の中に<plugin>~</plugin>で
Mavenに組み込むプログラムを記述します。
	<plugin>
			<groupId>org.codehaus.mojo</groupId>
			<artifactId>exec-maven-plugin</artifactId>
			<configuration>
			<mainClass>test.App</mainClass>
			</configuration>
	</plugin>
exec-maven-pluginは、javaのアプリケーションプログラムを起動するプラグインです。
<configuration>タグに<mainClass>で起動するアプリケーションを指定します。
(3)Mavenのコマンド
Mavenコマンドで下記の操作が行えます。
①プログラムのコンパイル
> mvn compile
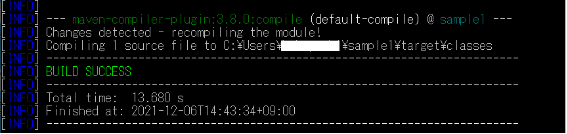
targetフォルダが作成され、その中にclassファイルが作成されます。

②プログラムのインストール
ビルドしたプログラムをローカルリポジトリにインストールします。
> mvn install
③Jarファイル作成
プログラムをJarファイルにまとめます。またWarファイルにまとめることもできます。
> mvn package
④ユニットテストの実行
> mvn test
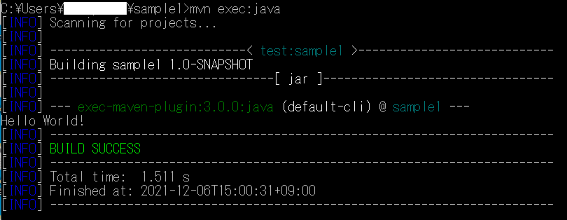
⑤mvn exec:java
javaアプリケーションを実行します。
exec-maven-pluginが組み込まれているときに使えます。
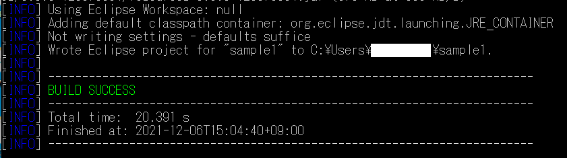
⑥Eclipseプロジェクトとして利用
Eclipseのプロジェクトとしてインポートして使えるようにします。
> mvn eclipse:eclipse
・EclipseにMavenプロジェクトを取り込む
Eclipseのインポート>一般>「既存プロジェクトをワークスペースへ」を選択
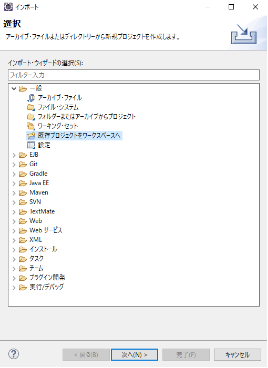
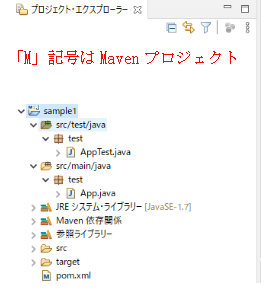
ルート・ディレクトリにMavenプロジェクトがあるフォルダを指定すると、Eclipseのワークスペースに取り込まれます。
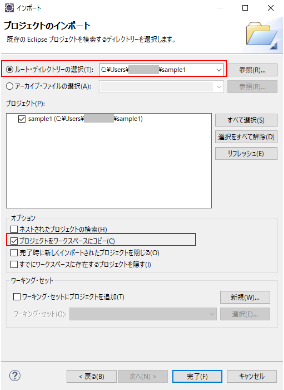
Eclipseのプロジェクト・エクスプローラーに表示されます。
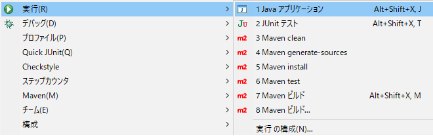
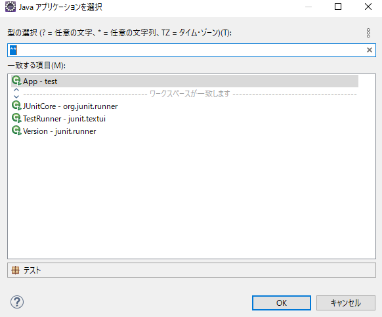
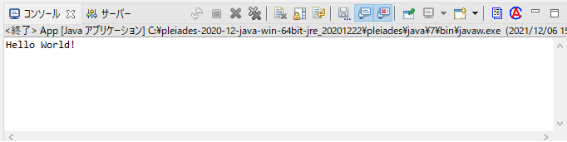
・javaアプリケーションの実行
プロジェクトを選択し、マウス右ボタンで実行メニューを表示し、「javaアプリケーション」を選択
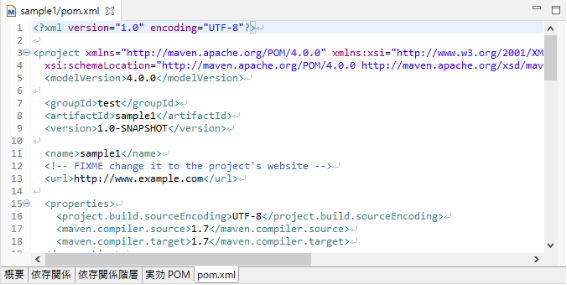
(4)pom.xmlの編集
Eclipseでは、pom.xml専用のエディタが使えます。
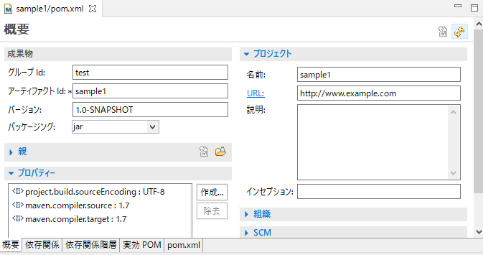
・「依存関係」タブ
タグにまとめる依存関係の追加ができます。
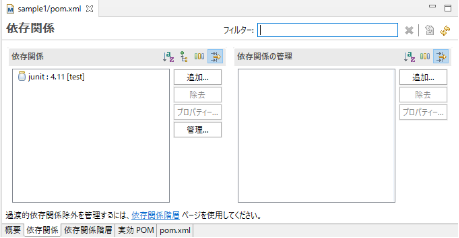
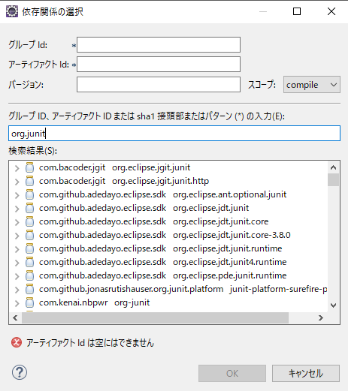
「追加」ボタンを押すと依存関係を記述するダイアログが表示されます。

インデックスのダウンロードが使用不可(デフォルト)になっているときは、ウインドウ>設定>Mavenの「起動時にリポジトリ・インデックス更新をダウンロード」をチェックして、Eclipseを起動しなおします。
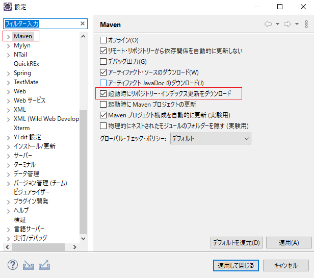
インデックス更新が完了するまで待ちます(30分以上要しました)。
グループId、アーティファクトIdのテキストの一部を入力すると、ライブラリの候補が表示されます。
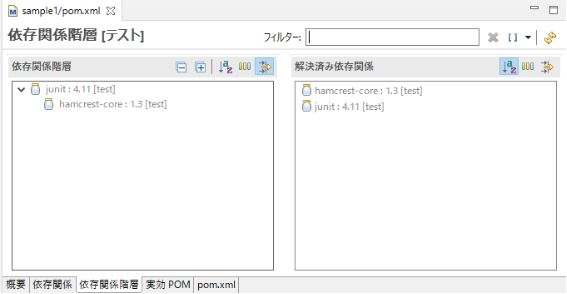
・「依存関係階層」タブ
<pluginManagement>タグでまとめる依存関係の追加ができます。
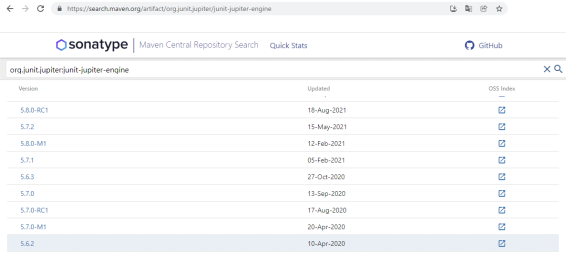
(5)リモートリポジトリの検索
ライブラリの<dependency>タグ内に記述するgroupId、 artifactId、versionについて、Mavenリモートリポジトリを検索して調べることができます。
https://search.maven.org/
(例)groupId:”org.junit.jupiter”のライブラリの検索
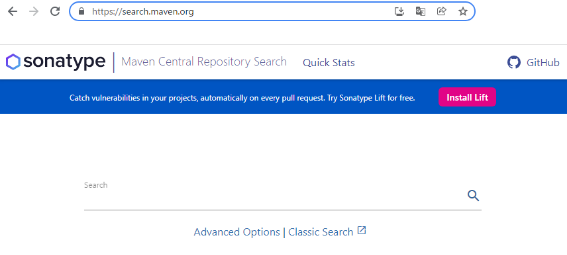
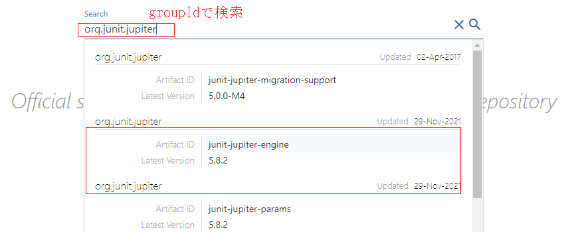
バージョンを選択し、<dependency>の内容をpom.xmlに追加します。

4.EclipseによるMavenプロジェクトの作成
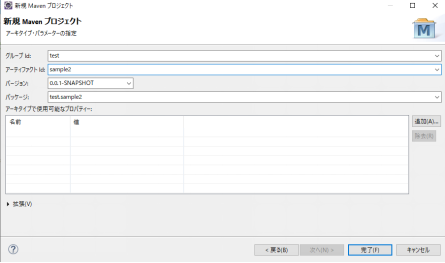
ファイル>新規>Mavenプロジェクトを選択します。
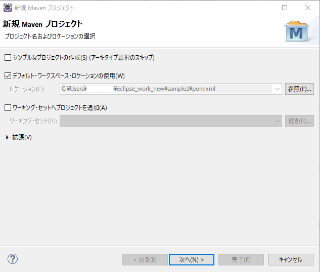
ここで、アーキタイプ(テンプレート)にはフィルタに「maven-archetype-q」を入力し、「maven-archetype-quickstart」を選択します。
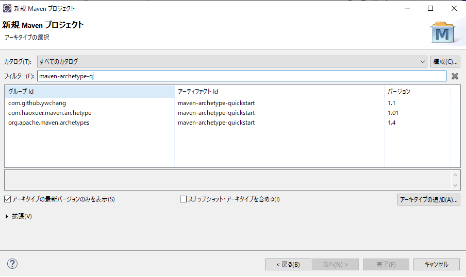
グループId、アーティファクトIdを設定します。パッケージ名はデフォルトで(グループId).(アーティファクトId)が設定されます。
Mavenコマンド「> mvn archetype:generate」でプロジェクトを作成したときと同じフォルダ構成で作成されます。
プロジェクト・エクスプローラーでプロジェクト名に(赤×マーク)が表示されましたが、Eclipseを起動し直して消えました(ライブラリ読み込み途中の状態表示が残っていたと思われます)。
(参考文献)
・「EclipseではじめるJavaフレームワーク入門 第5版」
著者:掌田津耶乃 発行:株式会社秀和システム
The end